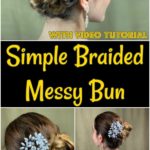
This braided messy bun is simply beautiful! I have seen this same style used for weddings, parties, prom, and even a simple day at work. A perfect braided style for long hair, this bun comes together easily, and since it doesn't have to be exact, anyone can do this. Even someone with no experience braiding hair. I love how this can be done in just a few minutes on my way out the door!

Braided Messy Bun
The messy bun is one of my go-to hairstyles, but it isn't exactly dressy enough for a big event. This unique version is just as easy to create but has just enough extra to make it go from "lazy day hair" to "effortlessly styled."
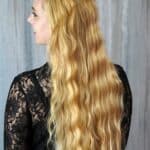
Every woman needs an easy style that can make them feel glamorous with little effort. This is definitely one I believe easily fits into that category. It's ideal for longer hair but could be adjusted for hair as short as just above the shoulder. You could even create a rendition of this with shorter hair, but the best look will come from a long style.

If you need more inspiration for styling your hair, then you need to check out this list of incredible 5-minute hairstyles. If you have short hair, you'll want to check out these stress-free hairstyles for short hair and these hacks for short hair. Tons of great ideas are in these posts to help make styling your hair fast, simple, and stunning. You never have to have a day with boring hair again! There are so many incredible ways to style your hair easily for a beautiful look.
Tools I Use
Other hair tools I love:

For different style ideas, you will love this fun way to curl your hair using only paper towels. If you have naturally curly hair, then you need to follow this simple tutorial for styling curly hair. There are so many great ways to change up your hair routine that will add unique looks in little to no time.
How to Create a Braided Messy Bun
Start by combing and detangling your hair so it is easy and ready to style. I find this style works best with "dirty" hair that hasn't been washed that day. This helps the style hold better and eliminates the problem of having fly-aways or loose hairs.
Step 1
To style your hair, you will begin by separating your hair into three sections. I start by pulling the front up in a "half up" style, as shown, and tie with a hair tie, then loosening a bit to add some volume on top.

Now, you will take the hair on the right side and gather it into a ponytail.

Then, take the hair on the left side and gather it into a ponytail.

Step 2
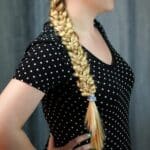
Now that you have your hair separated into three sections, you will start with one side and begin a twist braid. To do this, you will divide that ponytail up into three equal sections and twist each section while braiding them. This will result in the look shown. {See video tutorial if uncertain}.

Once the twisted braid has been tied at the end, you will then gently pull the hair apart to fluff and give it more body.

Repeat this process with the middle section of the hair.

Finish by doing the same with the other side ponytail until all three are in a twisted braid.

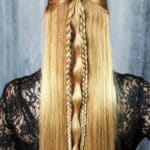
Step 3
Take the middle braid, twist it up onto the middle of the back of your head, and pin it in place. This will be similar to a regular bun by wrapping it around itself.

Twist one of the side braids and pin in place beside the first bun as shown below.

Finish this by doing the last braid, placing it slightly lower and close to the nape of the neck, as shown.

Step 5
Once all braids have been pinned in place, you will loop a string of beads onto the top side of the bun, as shown.

Attach the beads or floral accents using decorative pins.

Once everything is in place, you can check and add bobby pins to any loose areas and spritz the look with hairspray to hold in place.


Leave a Reply