If you are looking for the ultimate way to display or present egg-shaped Easter candies, why not put them in a bird’s nest? Of course, you cannot simply grab one from outside.
But with this easy Easter craft tutorial video, you will be able to create your own out of cardboard. It will be so realistic that, at a glance, no one will be able to tell the difference.

I have included a full list of materials and tools you will need to make this DIY Easter craft below. While many of them are straightforward, there are a few I would like to discuss.
I mentioned that you will need brown cardboard in several shades. For this project, you will want to use very thin cardboard or even go with cardstock. Construction paper also probably would work okay.
Under tools, I have listed a paper shredder. If you do not have a paper shredder, a pasta machine may also do the trick. Otherwise, you will be stuck doing this step by hand, or you will have to purchase cardstock or paper that has been pre-shredded.
It will take you a long time to cut the strips using scissors, and you may also have a hard time getting them extra thin. The thinner you can get the strips, the more realistic the finished effect will be.
So if there is any way to get paper that has actually been shredded properly, that definitely is ideal.
Finally, it is worth talking for a moment about the bowl, which I've listed under materials. This can be any size or shape of the bowl you want.
You will be using it as the mold to create the nest, so decide what to use based on the finished result you want to achieve.
Now, you are ready to look over the full list of materials and tools below. Watch the video and follow along with the written instructions and images to create your own DIY bird’s nest.
Jump to:
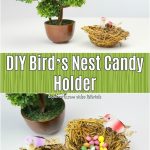
Bird’s Nest Candy Holder Photo and Video Tutorial.
Materials:
- Brown cardboard in several shades
- Crafting glue
- Hairspray
- Bowl
- Bird ornament
- Candies, eggs, or other contents
- Aluminum foil
Tools:
- Scissors
- Paper shredder (optional)
- Paintbrush

Instructions:
1. First, shred the cardstock, cardboard, or construction paper you have decided to use. Try to get the strips as thin as possible so that they look like what you see in this image.


2. In this video, I am making two bird’s nests simultaneously. You can make as many or as few as you like at one time.
Anyway, get the bowl or bowls. Turn each bowl upside down (for the sake of simplicity, from here on out, I will just reference a single bowl). Cover the bowl in aluminum foil, pressing it down so that it molds to the surface of the bowl, conforming to its shape.
3. Cover the aluminum foil over top of the bowl with crafting glue.


4. Gather your construction paper or cardstock strips and press them down over the top of the aluminum foil. As you did with the foil, compress them around the shape of the bowl as closely as possible. Make adjustments to the placements of the strips as you feel you need to in order to get the appearance you are after.


5. Apply hairspray next to the strips.

6. Wait patiently for everything to dry and set. Once it has, you can carefully remove the aluminum foil. You should find that your bird’s nest now has the proper shape and sticks together on its own.

7. If there is any additional ornamentation you want to add to your completed bird’s nest, you can do so at this point. You can glue these ornaments in place if you wish or not. I decided to glue some bird ornaments to my nests to make them look more realistic.

8. Now, all you need to do to finish your project is put some egg-shaped Easter candies inside your nest. You can then put your nest out on display or present it to a recipient.


Set Your Handcrafted Bird’s Nest Out on Display For All to Enjoy
You have now finished crafting a beautiful and surprisingly convincing bird’s nest out of ordinary cardboard, cardstock, or construction paper. It is sure to delight anyone who sees it.
It also can make a great rustic decor item throughout the year, not only over the Easter holiday.
While your handcrafted bird’s nest is perfect for egg-shaped candies, it also can be used to hold decorated Easter eggs if you have made it sufficiently large.
Looking for some easy Easter egg tutorials to decorate your eggs in unique ways? In this video tutorial, find out how to glam up ordinary plastic Easter eggs.
If you're looking for something more rustic to match your bird's nest, try this video tutorial for creating a rustic twine Easter egg decoration.
Easter Projects
While you are creating Easter eggs and nests, why not craft some Easter chicks as well? Here's how to make a cute Easter chick out of DIY pom-poms. You can also craft some adorable little Easter hens to go with them from an egg carton.
Enjoy these fast and easy Easter craft projects, and check back again soon to see what new tutorials we have added.


Leave a Reply