DIY & Crafts

Save money and have fun doing things yourself

  • Home
    • Furniture Makeovers
  • Repurpose
  • Crafts
    • Kids
    • Paper
    • Winter
  • Holidays
    • Valentine’s Day
    • Easter
    • Halloween
    • Christmas
  • Fashion
    • Sewing
    • Beauty
    • Hairstyles
  • Gifts
    • Baby Shower
    • Father’s Day
    • Mother’s Day
  • Homemade
  • Home
    • Lifehacks
    • Decorating
    • Organization
    • Parenting
    • Gardening
    • Health
  • Food
    • Recipes
  • Knitting & Crocheting

Home » Holidays » Easter » How to Make a Colorful Easter Wreath Out of Sticky Notes

How to Make a Colorful Easter Wreath Out of Sticky Notes

March 22, 2019 By Vanessa Beaty Leave a Comment

In search of cheap, easy DIY wreath idea for Easter? In this video tutorial, we will be making handcrafted Easter wreaths. The finished result of this project is beautiful and dramatic, but the supplies which go into it are surprisingly mundane.

We’re going to be using cardboard and sticky notes!

How to Make a Colorful Easter Wreath Out of Sticky Notes
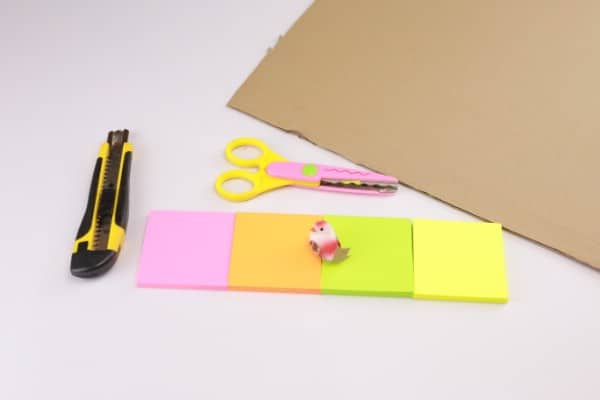
The materials you need for this thrifty Easter project are probably already waiting for you in your craft room or home office. You will need some cardboard.

Since it will be used as the backing for the wreath, sturdy, ordinary cardboard (like that from a box) works perfectly.
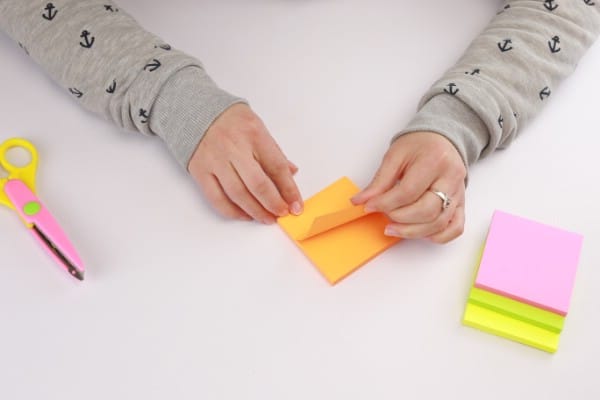
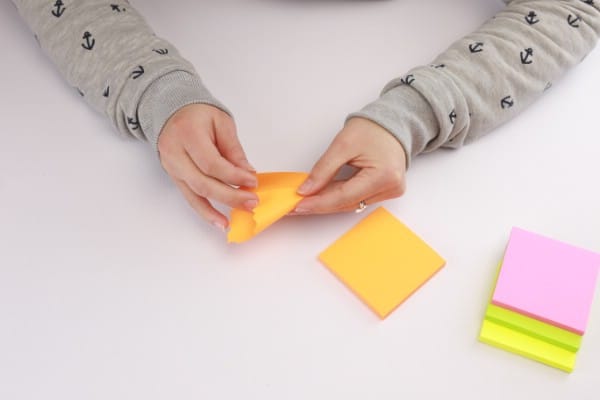
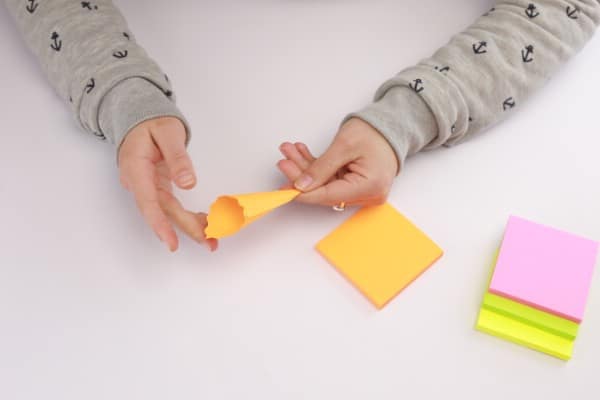
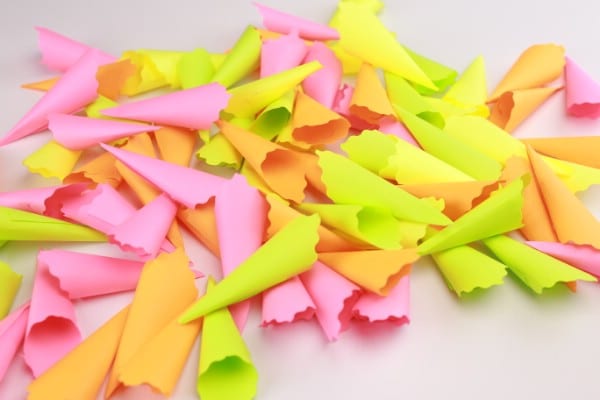
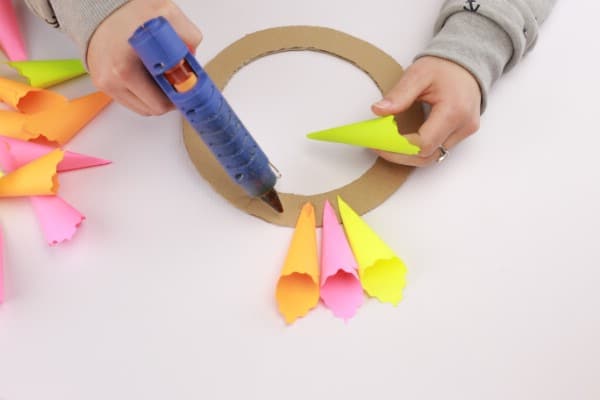
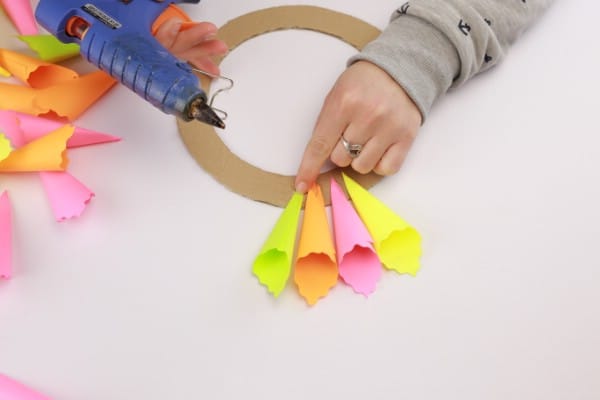
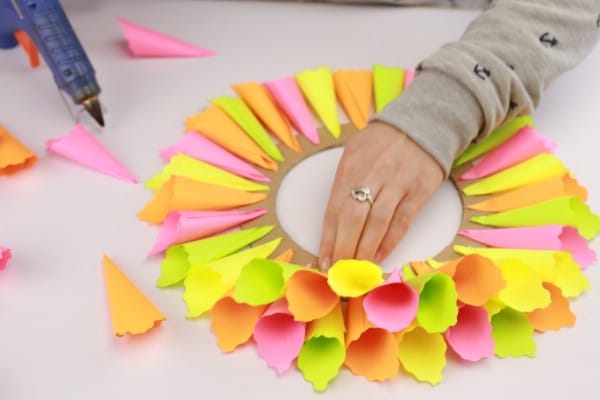
The other main supply which we will be using to create this handmade Easter project is sticky notes. Any size or brand of sticky notes works just fine.

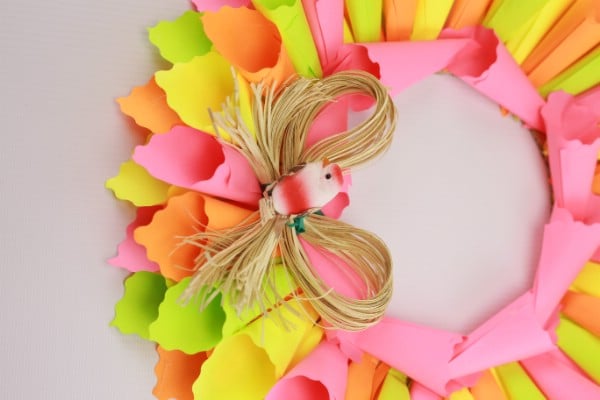
You can also pick any colors, but you want to aim for springtime hues to make this an Easter-themed wreath.

I chose fluorescent yellow, green, orange and pink to make my Easter wreath.

If you are ready to begin working on this creative and cheap Easter craft, you can find the full materials and tools required below.

You also can find a set of written instructions which you can read as you are watching the video to view all the steps. Let’s get crafting!

Step by Step Video and Photo Tutorial


Yield: 1

How to Make a Colorful Easter Wreath Out of Sticky Notes

How to Make a Colorful Easter Wreath Out of Sticky Notes

Want to make a bright, colourful wreath to welcome springtime? In this video tutorial, we will be crafting Easter wreaths using the most ordinary of supplies—sticky notes. Check out the video to see how it’s done.

Prep Time 5 minutes
Active Time 15 minutes
Total Time 20 minutes
Difficulty Easy
Estimated Cost $5

Materials

  • Sticky notes
  • Cardboard
  • Twine
  • Bird ornament

Tools

  • Scissors
  • Scalpel
  • Hot glue and glue gun

Instructions

  1. Sticky note wreath materials.You will begin by cutting out the shape of the wreath from cardboard. The exact size and shape of the wreath are entirely up to you. I made mine a traditional circle shape.
  2. Even though you can get away with using scissors to cut out the wreath backing, you will have a difficult time when you need to cut out the middle section. For this reason, if you have a scalpel or similar precision cutting instrument, you will want to use it for this step.Cutting the cardboard for wreath.
  3. Your next step is to fold a whole bunch of cone shapes out of your sticky notes.
  4. You want to roll each in such a way that one of the corners of each sticky note becomes the point of the cone. The opposite corner of the sticky note will be protruding out from the end of the cone, giving it a petal-like appearance.
  5. What is great about using sticky notes to do this is that you can make use of the sticky part of each note to hold the cone together without using glue. This might be worth considering if you are low on glue when you sit down to craft.
  6. If you are worried, however, that the cones will not hold together, you can always apply a bit of glue to each one just to be on the safe side. Any type of glue should work great for this.
  7. For a decorative effect, I cut the outer edge of each sticky note cone with a scalloped design. You can do this before or after folding the cones—whichever is easier for you.Folding the sticky notes.Folding the sticky notes.Folding the sticky notes.Folding the sticky notes.Folded sticky notes ready to be glued.
  8. The next step is to glue a ring of sticky note cones all the way around the cardboard wreath backing you created earlier.Using hot glue to attach the folded sticky notes.Using hot glue to attach the folded sticky notes.
  9. After you have created that first layer, you will glue on a second one on top of it. Set down each cone in that second layer in between two of those below it. This will create a full effect and eliminate any gaps.Filling any visible gaps with folded sticky notes.Attached every sticky note nearly finished wreath.
  10. At this point, we can still see a bit of the cardboard showing through at the center of the wreath where the point of the cones are situated.
  11. To conceal this cardboard, you can glue on a few more sticky note cones all the way around the inside of the wreath. Instead of gluing them in the same orientation that you did the others, glue them down end-to-end to make a ring. Once you have done that, no more of the cardboard should be clearly visible.
  12. You can call your wreath completed at this point if you would like. If you prefer, you can embellish it further. I added a bird ornament mine with a twine attached to it.Attaching the embellishments.
  13. Here is what your completed wreath should look like. As you can see, it is simply stunning.Finished Easter sticky notes wreath.Finished Easter sticky notes wreath.
© Janice Swanson
Project Type: Paper Crafts / Category: Easter
Hang Your Easter Wreath to Display

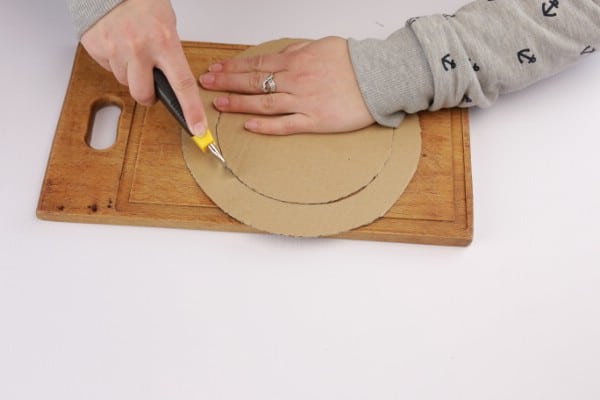
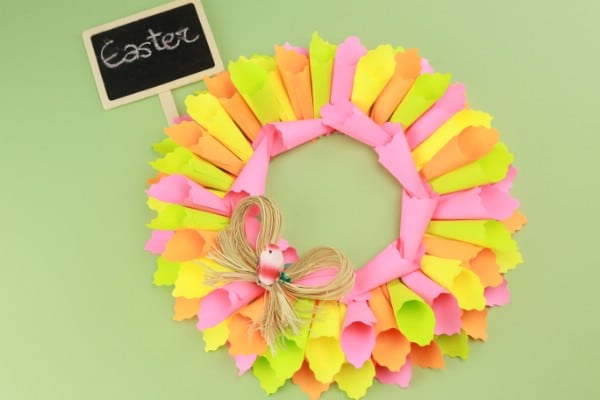
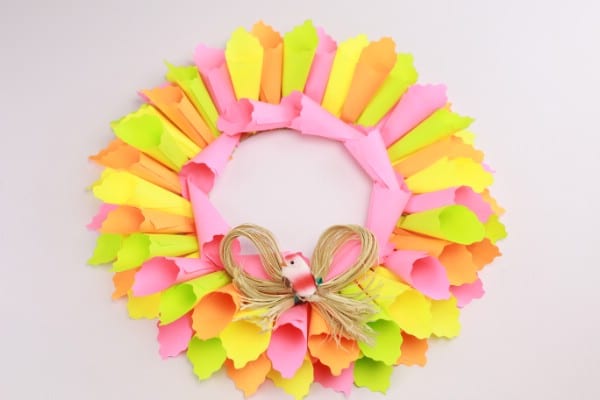
Now that you have completed crafting your Easter wreath, you can hang it to display on your wall or on a door.

This makes a great decoration at home, in the classroom, or even at the office (especially since you made it using office supplies—hopefully not those from work!).

The vibrant colors will instantly brighten any room.

Looking for more Easter crafts you can make out of simple supplies? Try making this Easter bunny craft out of cardboard, or turn any photo of your child into a cute Easter bunny.

Easter Projects

How to Make a Cute Easter Bunny Candy Bottle {Video Tutorial}

How to Make a Cute Easter Bunny Candy Bottle {Video Tutorial}

100 Easy and Delicious Easter Treats and Desserts

100 Easy and Delicious Easter Treats and Desserts

36 Cute and Creative Homemade Easter Basket Ideas

36 Cute and Creative Homemade Easter Basket Ideas

25 Creative DIY Outdoor Easter Decorations That Fill Your Yard With Joy

25 Creative DIY Outdoor Easter Decorations That Fill Your Yard With Joy

105 DIY Easter Decorations You Can Make Yourself

105 DIY Easter Decorations You Can Make Yourself

58 Fun and Creative Easter Crafts for Kids and Toddlers

58 Fun and Creative Easter Crafts for Kids and Toddlers


Check back with us again soon, as we are always adding more video tutorials to the site, and have plenty more Easter crafts in store for you.

282shares

Subscribe to Blog via Email

Enter your email address to subscribe to this blog and receive notifications of new posts by email.

Join 10,206 other subscribers

Leave a Reply Cancel reply

Your email address will not be published.

This site uses Akismet to reduce spam. Learn how your comment data is processed.

Search

Subscribe to Blog via Email

Recent Projects

15 Fantastic Root Vegetables You Can Grow in Containers

20 Tried and True Tips for Urban Gardening Success

18 Vegetables Plants Best For Starting as Indoor Seedlings

50 Drought-Tolerant Plants You’ll Hardly Ever Have to Water

Pages

  • About Us
  • Be Featured
  • Contact Us
  • Email and Push Notification Subscriber Settings.
  • Privacy Policy
DIYnCrafts.com is a participant in the Amazon Services LLC Associates Program, an affiliate advertising program designed to provide a means for sites to earn advertising fees by advertising and linking to amazon.com, amazon.co.uk, amazon.ca and amazon.com.au.

Copyright © 2021 DIY and Craft Projects and Collections

282shares