DIY jewelry projects like these are a passion of mine, so naturally, DIY jewelry organization is as well. This is why I have shared a list of 25 genius jewelry storage projects with you in the past.

Recently, I was lucky enough to discover a really awesome project to create a cute little jewelry box using a very surprising supply … a duct tape roll, of all things. I am crazy about this project because it makes a little box, which is just the right size to present as a gift box. So not only have I made several of these for myself, but I’ve also started making them use as gift boxes in the future for presents of handcrafted jewelry for family and friends.
Ready to see how to make your own? Learn how in under a minute with this exclusive video from DIYnCrafts!
Jump to:
Video Tutorial:
Subscribe to our YouTube channel here.
Materials:

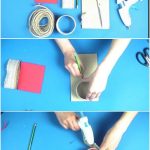
Steps:
1. Get a duct tape roll that is empty of duct tape.
2. Use the duct tape roll to trace two circles on a piece of cardboard.

3. Cut them out.

4. Trace a same-sized circle on a piece of colorful construction paper.
5. Cut that out as well.
6. Put some glue around the rim of one of the pieces of circular cardboard and attach the duct tape roll to it.

7. Insert the piece of paper, gluing it to the bottom.

8. Glue burlap or another decorative material of your choice around the outside of the duct tape roll to decorate it and conceal its true nature.

9. Glue twine in a spiral around the top of the second circle of cardboard, covering it completely. This will be the lid of the jewelry box.

10. Add any embellishment you want to the top of the lid to complete the look.
11. Put your lid on your box, and you are all done.

You now have a beautiful little jewelry box to use or give as a gift!


Tanya
It was a good one
Tanya Dawkins
It was a good one