
I am so excited to share this latest DIY project with you! I was at a garage sale recently, and they had these beautiful plates that I just had to have. Don’t ask me why…I have plenty of plates already, but these were so pretty that I just knew I could do something with them.
So, I did what I did, and I looked around for a project using those plates. I found this gorgeous jewelry holder. And note that these are plastic dishes! You can do this with decorative plastic dishes or glass…your choice!

Jump to:
- What You Need To Make This DIY Repurposed Plate Jewelry Holder
- What Kind Of Jewelry Will This DIY Jewelry Holder Keep?
- What Sizes Of Dishes Do You Need For A DIY Jewelry Organizer?
- How To Make A 2-Tiered Jewelry Stand From Repurposed Dishes
- Materials
- Tools
- Instructions
- Recommended Products
- What Other DIY Jewelry Organizers Can You Make?
- Pin this project:
What You Need To Make This DIY Repurposed Plate Jewelry Holder
So technically, this is a project that I made with one plate and a matching bowl…and a cheap candlestick that I had in my junk closet. If you are buying the supplies to make this, I suggest you visit the Dollar Tree or your local thrift store.
Goodwill has dishes for about a dollar each, and you can find some really beautiful pieces there.

What Kind Of Jewelry Will This DIY Jewelry Holder Keep?
So, I’m sure I have mentioned how much I love jewelry. Honestly, I think I have more jewelry than I have clothing, and I wanted to make something that would hold my most worn pieces…you know, those rings and bracelets that you wear nearly every day.
This is perfect! You can keep rings and earrings on the top and bracelets on the bottom, and it will hold tons of smaller items.
What Sizes Of Dishes Do You Need For A DIY Jewelry Organizer?
You can see in the pictures that my plate and bowl aren’t huge. It’s more like a saucer and matching bowl, but you could absolutely use a standard-sized dinner plate if you wanted something bigger on the bottom.
You could also use a smaller version of that plate on top if you don’t have a bowl or if you just want to mix it up a bit.

How To Make A 2-Tiered Jewelry Stand From Repurposed Dishes
As jewelry organizers go, this 2-tiered jewelry stand is one of the easiest that you will ever make.
This is perfect for keeping your rings, earrings, and other go-to jewelry pieces organized, and it makes a wonderful gift for any jewelry lover that you know.
DIY Two-Tiered Jewelry Stand from Repurposed Dishes
Watch this video tutorial to learn how to turn plates into a fabulous jewelry holder. Just a couple of old plates and some basic craft supplies are all you need to create this gorgeous jewelry stand.
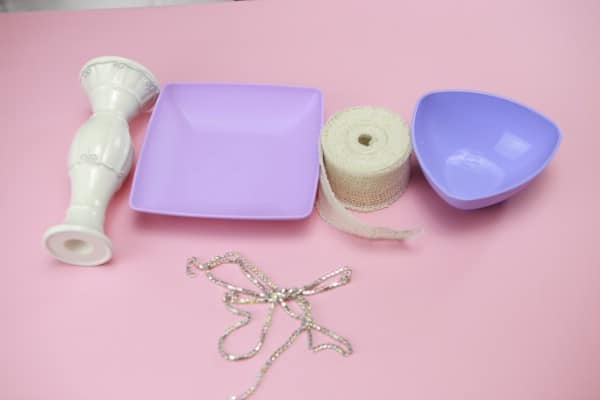
Materials
- 1 Small Plate
- 1 Small Bowl
- Candleholder
- Ribbon
- Decorative Pearls or Other Decorations
Tools
- Hot Glue Gun
Instructions
 Like I’ve mentioned, I used plastic dishes for this project, but you can use glass or ceramic if that’s what you have.
- First, you need to choose your dishes. I’ve used a small plate and bowl, but you can also do this with two plates – one larger and one smaller to give it dimension.
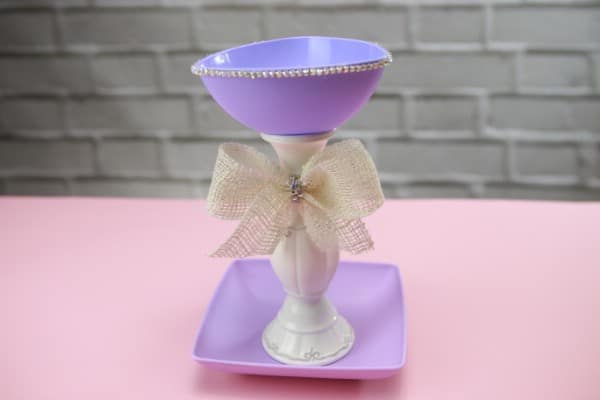
- Start with your larger plate. Glue your candlestick onto the middle of the plate.
- You could also use a wooden decorative dowel for this as long as it’s thick enough to support your plate. I like the candlestick because it’s elegant and gives it so much beauty.
- Now, glue the center of the bottom of your smaller plate or bowl onto the top of the candlestick.
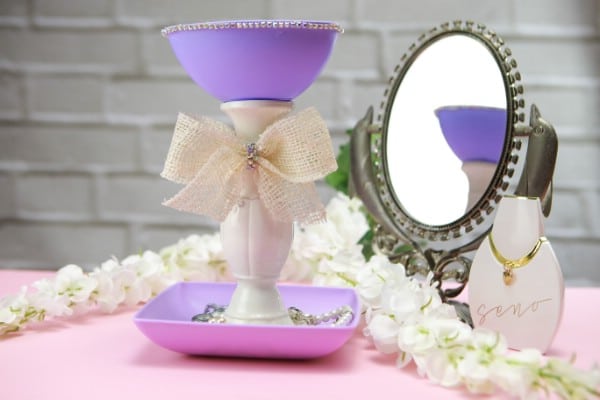
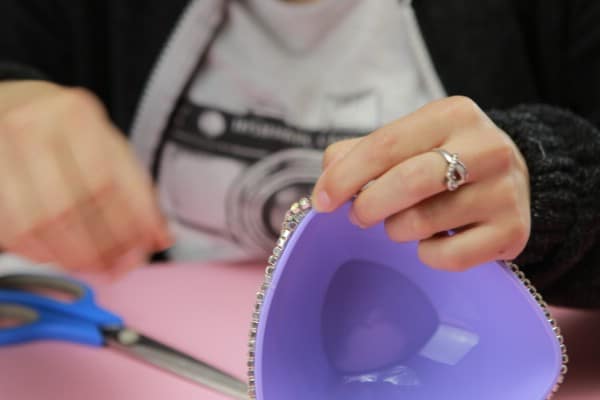
- That’s it! Now you can decorate. I’ve used a string of silver that looks like it has diamonds around it – a great craft store find if I do say so myself. But, you can use pearls, gems or whatever you want to decorate the edges of your plates.
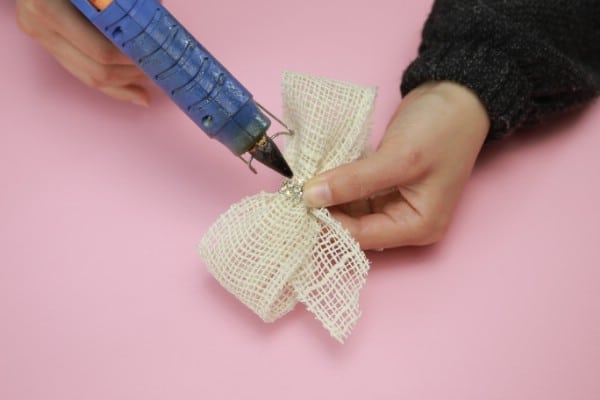
- You could also create a bow from burlap or ribbon and glue it to the top of your candlestick directly under the top plate.
- If you want, you can do this in a three tier fashion. Just use two candlesticks and add another smaller plate to the top. Make sure that your plates always run larger to smaller so that your jewelry organizer is sturdy.
- Also, if you can’t find plates in the color that you want, you can spray paint them before you begin. Just make sure to give them plenty of drying time before you put your jewelry stand together.
- And that’s all there is to it. This is a simple and quick solution to your jewelry organization problems. For reference, here’s what my DIY jewelry organizer looks like:
 Like I’ve mentioned, I used plastic dishes for this project, but you can use glass or ceramic if that’s what you have.
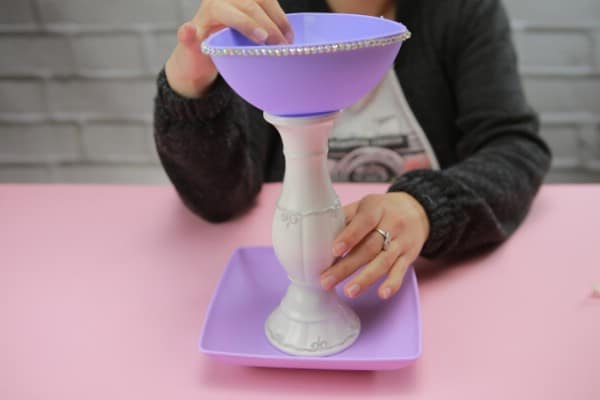
Recommended Products
As an Amazon Associate and member of other affiliate programs, I earn from qualifying purchases.
What Other DIY Jewelry Organizers Can You Make?
Because I love jewelry so much…and because I virtually own my own jewelry store with all that I have…I have shown you some amazing jewelry organizers over the years…and some DIY jewelry, too!
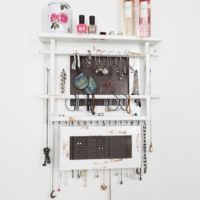
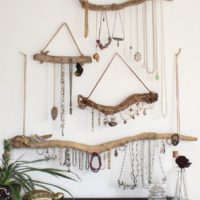
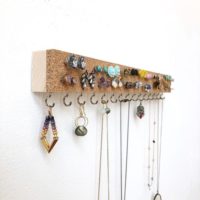
I’ve shown you how to turn a picture frame into a DIY decorative jewelry hanger to keep necklaces organized and how to make a tiered jewelry holder from pots and trays.
I’ve also got a great tutorial that shows you how to make a jewelry box from a duct tape roll. Now, we’re going to add this gorgeous tiered jewelry organizer to the list!

Pin this project:

What’s Your Favorite DIY Jewelry Organizer?


Leave a Reply