Sometimes, the simplest craft supplies are also the most versatile. Until recently, I overlooked just how much you can do with basic popsicle sticks, craft sticks, or tongue depressors.

But I’ve already got a couple of cool projects on the site that use popsicle sticks. If you missed it a few months ago, be sure to check out how you can create an adorable mini-pallet for succulent plants here. Also, take a look at this recent project for creating DIY napkin holders.
Today I actually have three new popsicle stick crafts for you. They are all so fast and easy that I’ve been able to showcase them all in a single video which is under three minutes long. Check it out!
Video tutorials:
Materials:
(Amazon.com affiliate links)
- Popsicle sticks
- Paint if you want to make them a different color
- Glue and glue gun
- Embellishments like bows, flowers, etc.
- Tape rolls (2)
- Scissors
Steps:
Picture Frame
1. Make a square by gluing 4 popsicle sticks together.


2. Get 2 more popsicle sticks and glue those on top. They should be parallel to each other and to the inside of those forming the existing frame (see pictures or video).
3. Get 2 more sticks and do the same thing again, but these ones should go the other direction (again, this is easier to see in the video).


4. Add embellishments of your choice.

5. Attach some twine so you can hang it.


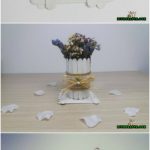
Vase
1. Glue 7 popsicle sticks together side to side to form a rectangle.


2. Get 2 other sticks and glue them perpendicular to the rest on either side to hold them together.

3. Get an empty tape roll and glue around the bottom edge of it.

4. Attach it to the base you have created. Do this a second time, stacking a second tape roll on top.


5. Glue popsicle sticks all around the sides so that you cannot see the tape rolls.


6. Add embellishments as you wish.


Doll Bench
1. Set 2 popsicle sticks down parallel to one another, but with a slight gap between them.
2. Attach a popsicle stick at either end using hot glue (please see the video or photo). This is the back of the bench along with its back legs.

3. Glue 3 other popsicle sticks together to make a flat unit.

4. Attach them to form the “seat” of the bench.

5. Cut another popsicle stick to form the front legs of the bench and attach them.

6. Add embellishments.

There you go—three awesome, easy popsicle projects in a single video. Have fun!


Beth
Hi Ursula, The notification pop-ups are controlled by your computer. The easiest way to tell you how is for you to open your Internet browser window and select Help. Then search for Notifications. You should find the instructions to disable pop-up notifications.
Hope that helps.
Vanessa Beaty
Indeed we can't revoke permissions on receiving new post notifications since it's a local setting in your browser.