I love everything about Easter—the warm weather, the occasion to get together with family and friends—and the chance to spoil my kids with candy and gifts. A lot of the adults in our family also give gifts since it’s one of the few times of the year we can all get together. So, each year, I try to come up with a fun gift idea that is good for kids and adults—and this year, I have a great one.

Before I share it with you, though, I want to quickly draw your attention to a couple of recent Easter posts you may have missed! We now have an amazing list of 25 mason jar Easter crafts here, and here you can watch a video to learn how to make a cute Easter napkin bunny bag.
Speaking of videos and cuteness, here is the video I want to share with you today! In it you can learn how to make a carrot-shaped box out of paper (or you could use cardboard for something more substantial)! This is perfect for Easter gift-giving!
Jump to:
Video Instructions:
Here are the steps!
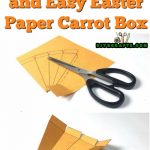
1. Start by gathering your supplies. The paper is an A5 paper or half of an A4 paper.

2. Next, grab a ruler and draw an array of straight lines as pictured below. The reason you need a ruler and not just a straight edge is that you want all the line segments to be the same length.

3. Next, cut out the shape as shown below. Then, fold along the line segments so that you get your box. Glue it together.

4. The last step is to cut out two carrot tops. Glue them onto opposing sides of the carrot, and then use a little green ribbon to tie them together. This is how you close your box and complete the project.

As you can see, it looks absolutely amazing, and it is so simple to make! This project is easy enough that it can be a fun Easter activity for adults or children. Enjoy!


Bobbie
Your fairy houses didnt work, as they dried they cracked and then crumbled when you picked them up. Yeds we used air- dry clay.
Vanessa Beaty
Check out this tutorial https://www.youtube.com/watch?v=_Ef-U6aZEoI&t=3s on how to make strong dry clay