
Why would you want to repurpose toys? Because you care for the environment and don’t like throwing things away. Because you have unused, broken toys that you can’t really give away in the condition they’re in. Because your children are out of the house and you want to hold onto the memories of them being youngens who needed you. Because you want to make a memorable and special gift for your now grown up offspring – something to treasure from their childhood that won’t actually look childish. Because you’re feeling nostalgic and want to find a modern way to still keep your old childhood toys nearby. Because the toys are cute and you want them.
Whatever the reason, it’s time to dig out your box of toys and get crafty!
Wagon Herb Planter
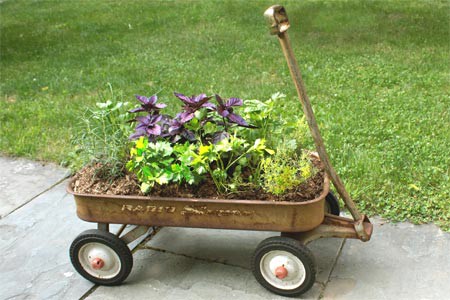 Here’s a nice quick and easy (and affordable) project that will look amazing in your garden: a wagon herb planter! I quite like the old, rusted look, but if that isn’t really your thing, just set some time aside to give it a little makeover.
DIY Instructions and Project Credit – ThisOldHouse
Wreath
 There’s no tutorial for this one, but you don’t really need one, do you? Just get a blank wreath ring and start gluing! If you want it to be more Christmassy, you could spray-paint half of the toys red and the other half green before sticking them on.
DIY Instructions and Project Credit – Andeverythingsweet
Lego Cable Holder
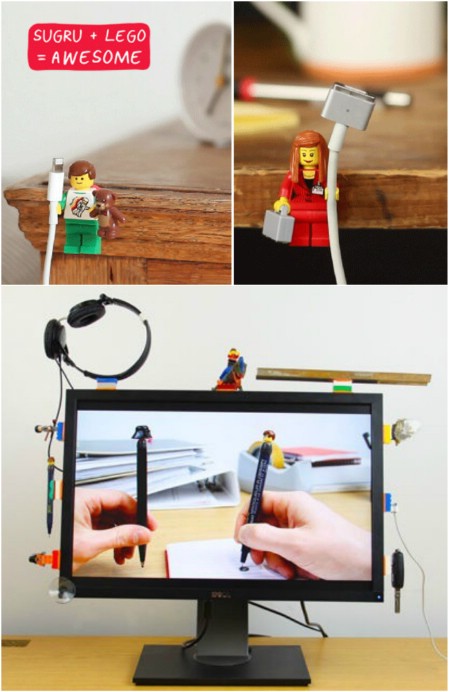 Have you ever noticed that that your Lego minifigures’ hands are the perfect size for most cables? No? Me neither! Stick these little guys by your desk so that you can organize your cables and keep them close for when you need them (instead of just letting them dangle on the floor, like I do now).
DIY Instructions and Project Credit – Sugru(1) and Sugru(2)
Double Decker Bookend
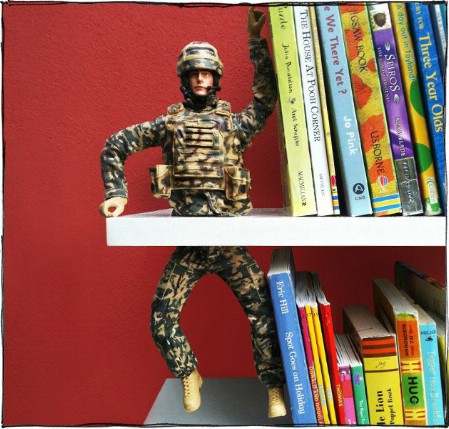 This isn’t just a case of leaning an action figure against all your books, oh no. This is a well thought out procedure of cutting the guy in half (ouchies!) so that he does his new job as bookend on both the top and bottom shelf.
DIY Instructions and Project Credit – Makezine
Faux Metal Doll
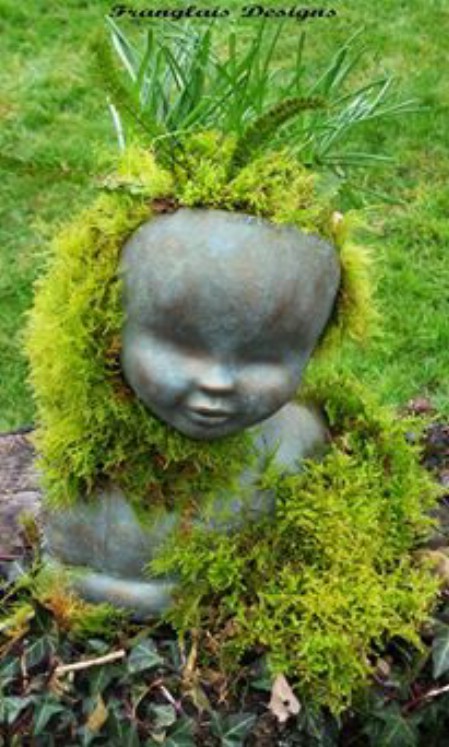 Ok, so some of you may find this extremely creepy, while others of you may squeal in delight at the creativity and weirdness of it all (I fall into the second category). The photos in this album show you just how you can transform these dolls to make them look like aged metal or stone busts, and it’s absolutely fantastic!
DIY Instructions and Project Credit – Facebook:FranglaiseDesigns
Dinosaur Bookend
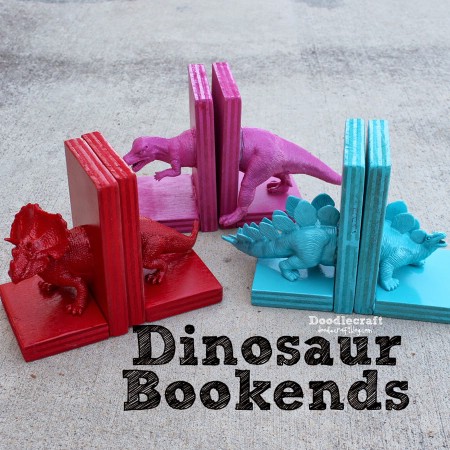 If you want a slightly more traditional bookend that’s still quirky and interesting, then you can simply cut some poor dinos in half and glue them onto wooden ‘L’s. Enjoy a little scrounge about in the old toy box and see what you can rustle up to butcher (and repurpose).
DIY Instructions and Project Credit – DoodleCraft
Jewelry Stand
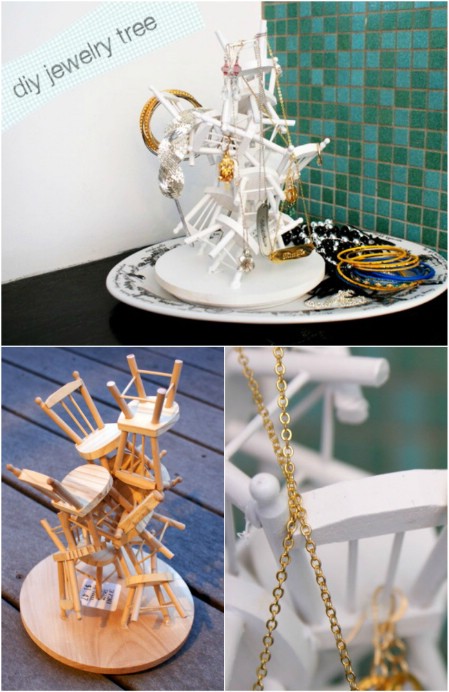 This idea of using dollhouse chairs to form an interesting jewelry stand is fantastic, but don’t feel limited to chairs alone. Have a look through all your available toys—from Barbie stuff to little soldiers and figurines—and use what you have.
DIY Instructions and Project Credit – DismountCreative
Jewelry Hanger
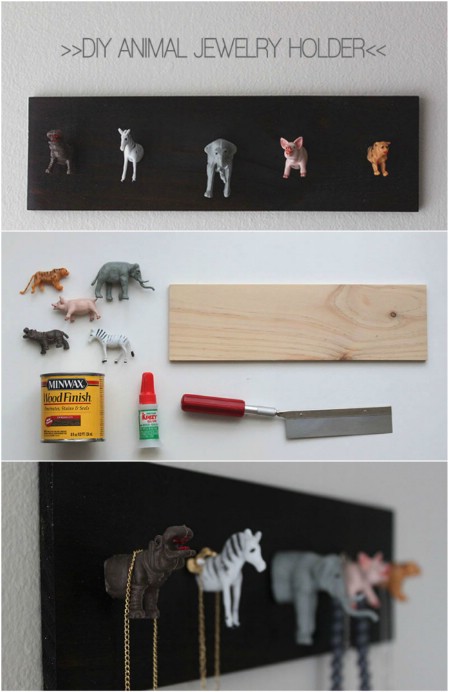 I’m not usually one for animal trophies, but these adorable plastic critters are just too cute! You can use practically any type of figurines, like superheroes, monsters, or even use dinosaurs if you prefer to go prehistoric. You could also use this is a cost rack by your front door.
DIY Instructions and Project Credit – WhyDon’tYouMakeMe?
Toy Lamp
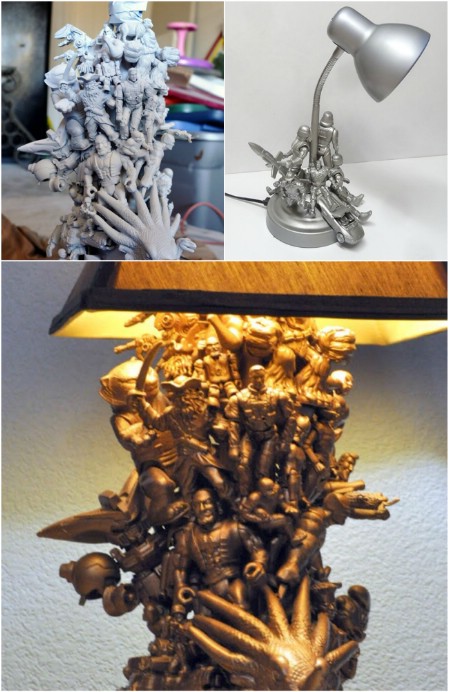 A cluster of toys as a lamp base? This is definitely one of my favorites on the list! Although it looks like organized chaos, you will have to do some experimenting and with the placement of the toys (and perhaps some snipping or resizing) so that it doesn’t look too out of control.
DIY Instructions and Project Credit – TurningStones-Part1, TurningStones-Part2 and Home-Dzine
Lego Key Holder
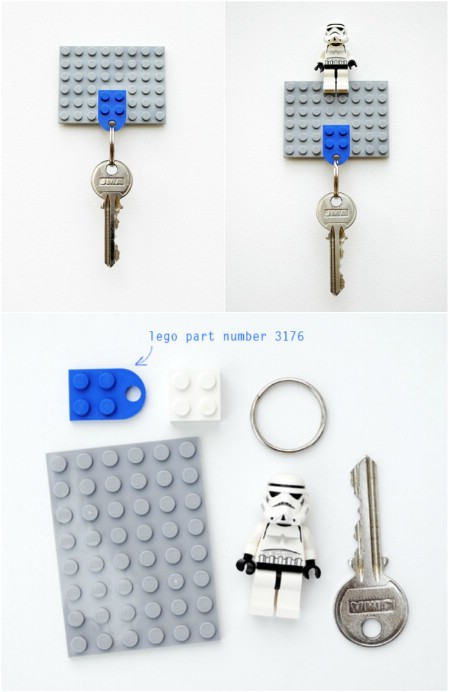 Does anyone actually ever outgrow Lego? Still love to bring out my old stash and build stuff every now and then. If you don’t have a proper hook for your keys by the door, turn a few of the Lego pieces into a key ring-hanger combo.
DIY Instructions and Project Credit – Minieco
Block Hooks
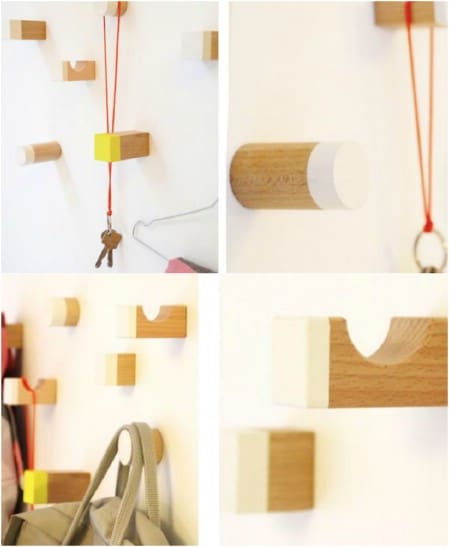
In need of some hooks from which to hang your bags, scarves, coats or keys? Regular hooks are boring. Instead, you can use some of your kiddo’s old wooden building blocks! The interesting shapes will make for such a cool and modern design.
DIY Instructions and Project Credit – Remodelista
Animal Candle Holders
 Ok, so these party animals are just fabulous! A good coat of paint really transforms them from cheap to rather stately-looking. Just look at that proud, golden ostrich! You could even use the same idea for place card holders – just attach the nametag to a toothpick.
DIY Instructions and Project Credit – TheSweetestOccasion
Truck Pincushion
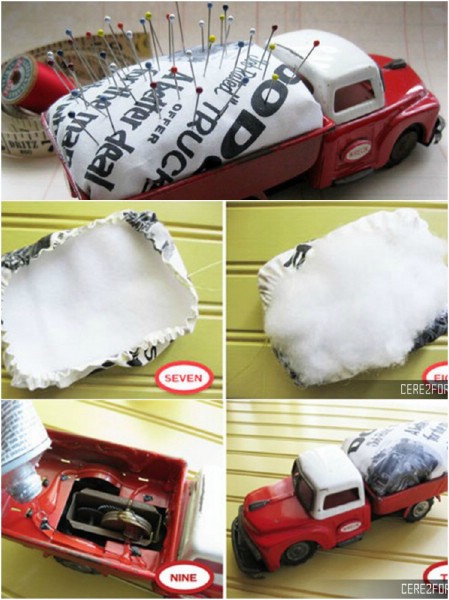 All you need is the addition of a padded “cushion” to the back of a toy truck to turn it into a brilliant pincushion on wheels! What I really love about this is the contrast between the truck, which usually evokes a sense of rugged manliness, and the act of sewing, which is usually seen as a dainty and more feminine pastime.
DIY Instructions and Project Credit – CerezForum
Lego Charging Station
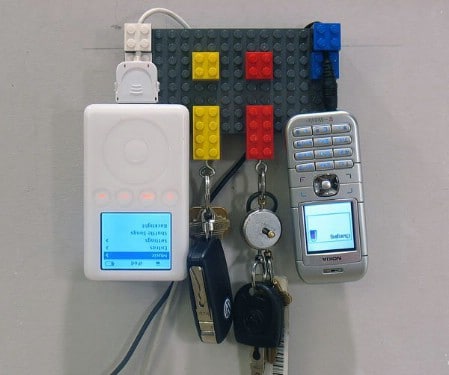 Ok, so I’m a little Lego-obsessed… can you tell? Here’s a really cool way to make a charging station that will definitely turn some heads. Don’t you just love seeing how quickly technology has progressed? Just look how old that phone and iPod look!
DIY Instructions and Project Credit – Makezine
Clock
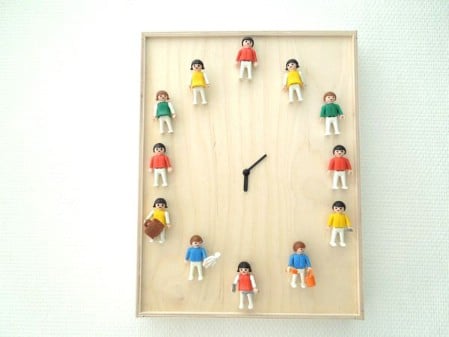 You can use absolutely any 12 (smallish) toys to make a nostalgic clock either for yourself or your grown-up child. Although it’s such a simple project to make, it can hold so many valuable memories!
DIY Instructions and Project Credit – De*RienMadame
Fridge Magnets
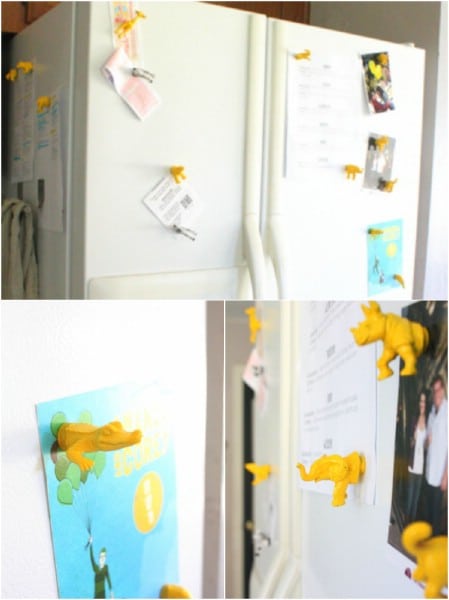 You can turn any cute little toys into fridge magnets with the help of those little round magnets. It’s insanely easy to do, and it makes your kitchen infinitely times more interesting! And you can paint the little suckers whatever color you want to match your kitchen décor.
DIY Instructions and Project Credit – Love&Renovations
Barbie Angel
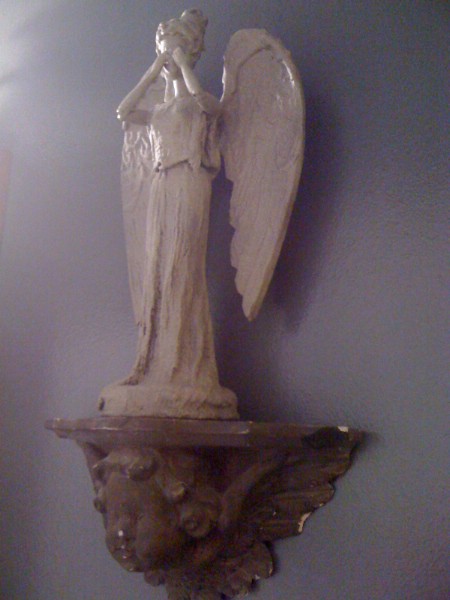 This is definitely one of the coolest crafts I’ve seen – doesn’t it really look like an actual stone statue? I’d never have guessed that there’s a forgotten Barbie under there! Since it’s much, much lighter than it looks, you could even use this as a Christmas tree-topper (in which case, I’d go for a silver or gold spray painted finish minus the stone texture).
DIY Instructions and Project Credit – Wich-Crafting
Fun Frame
 I’ve used this exact framing technique with seashells before, but never did I think that I could do it with some old, broken, or unused toys! If you’re mismatching a whole bunch of different toys then you’ll definitely need a coat of spray paint to make it look a little sleeker, but you don’t have to use just one color – an ombre effect would look fantastic!
DIY Instructions and Project Credit – AchadosDeDecoração
Hanger
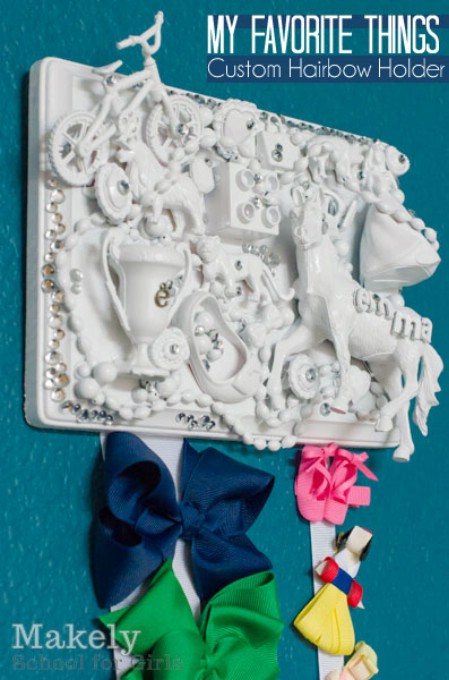 This project basically implements the same idea as the frame and wreath. I don’t really have many hair bows, so I’d simply attach some hooks at the bottom and use it as a hanger for things like keys, coats, jewelry, or scarves.
DIY Instructions and Project Credit – Makely
Toothbrush Holder
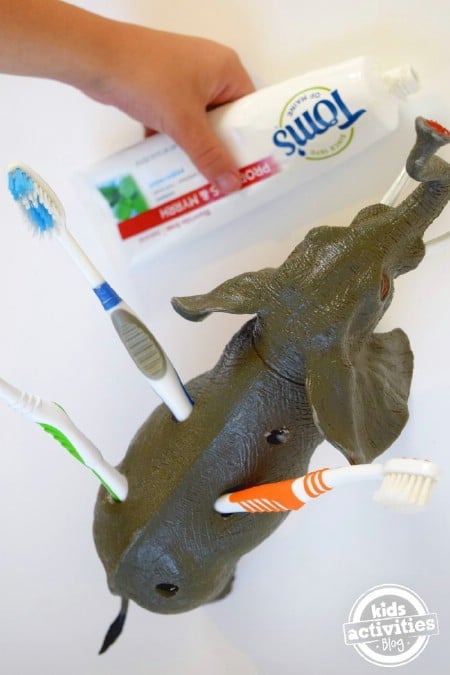 It’s time to bust out the power drill! Don’t worry, you’ll only need it for about a minute so that you can drill some toothbrush-sized holes into a plastic animal or dinosaur toy. Ok, so the process sounds rather grim, but the final product is adorable!
DIY Instructions and Project Credit – KidsActivitiesBlog
Corn Handles
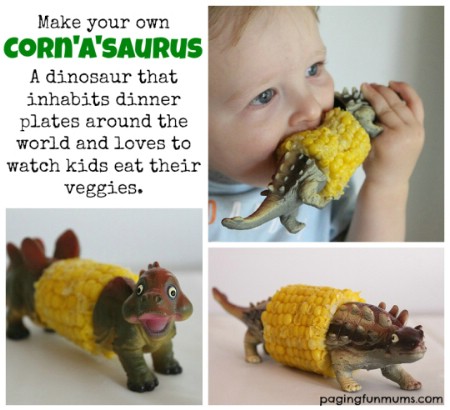 Have you ever looked at your corn holder handles and thought “These are just way too boring!”? No, I haven’t either, but this fantastically named Corn’a’saurus project goes on my list of things I don’t need, but really, really want.
DIY Instructions and Project Credit – PagingFunMums
Smartphone Tripod
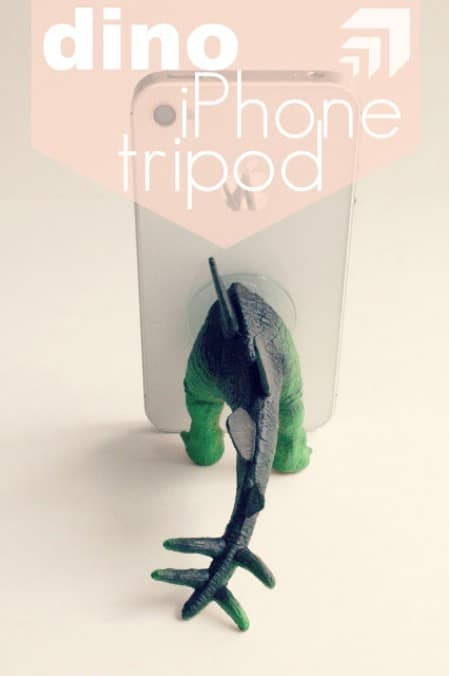 I realize that many of these projects seem to involve sawing toys in half… just please don’t take it as an indication of my mental stability! Any plastic dinosaur or animal can be turned into a playful smartphone tripod, as long as it has a long enough tail.
DIY Instructions and Project Credit – EatSleepMake
Drawer Knobs
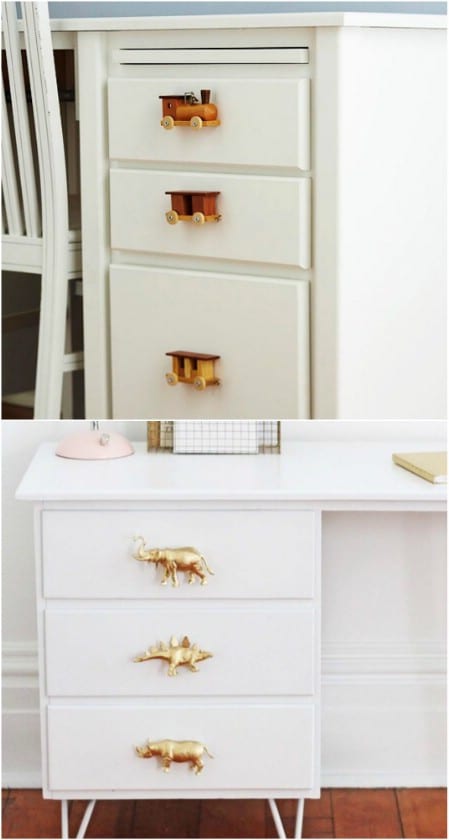 If you want just a cheeky little touch of nostalgia or playfulness, you can replace your regular drawer knobs with toys. You just need to attach a screw or bolt to the toy so that it fits through the hole at the front of your drawer.
DIY Instructions and Project Credit – BetterHomesAndGardens and ApartmentTherapy
Army Men Bowl
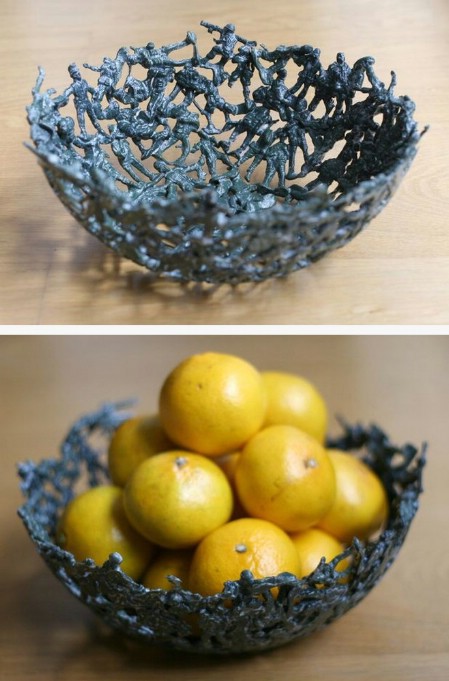 If a plain old fruit bowl just isn’t cutting it anymore, I suggest you dig out the plastic army men and melt them together to make a real conversation starter of a bowl. What a brilliant idea! Some commentators even suggested that you use this idea for a lampshade (just make sure to use a cool bulb that won’t burn your creation).
DIY Instructions and Project Credit – Instructables:N36
Plastic Planter
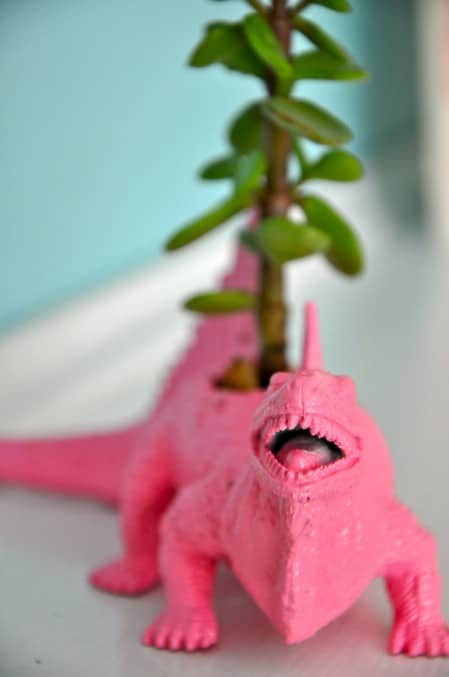 If your plastic animals and dinosaurs are hollow, then you can transform them into adorable little planters. These would make excellent little gifts, and they can really brighten up a room that’s in need of some foliage. Mini dinosaur planters stomping around in the garden would go down just as well.
DIY Instructions and Project Credit – LittleBitFunky


Merry
I love the dinosaur corn holders and the army men bowl! I'll have to make some for my grandkids.
Monika
Some of these are great! Also: http://www.mrkate.com/2013/05/14/diy-animal-jar-tops/
Ann Wingender
My favorite is the drawer knobs.
luiteak
me too !
Brooke
These are fun ideas for redesigning old toys. We just recently wrote about this topic on our blog (http://www.momapprovedtoys.com/2017/03/02/recreate-toys-already/) so I am glad I stumbled upon your article. Thanks for the additional ideas!
luiteak
this is my homework assignment