Halloween is really the beginning of the festive fall and winter season, I think, even before Thanksgiving. True, we all know Halloween is for kids, but come on—what’s not to love, especially if you’re a crafter?

There are SO many spectacular DIY projects for Halloween, like these 35 last-minute Halloween costumes, and these 25 gruesome DIY haunted house props.
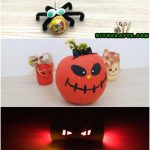
Now I want to share 5 fast and easy projects which you can do in a matter of minutes to add some more Halloween spookiness to your abode!
Jump to:
Video tutorials
Materials:
- Decorative paper
- Paper hat
- Hot glue and glue gun
- Scissors
- Plastic or glass bowl
- Flower pot
- Ribbons
- Water collection tray
- Toilet paper tube
- Marker
- LED tea light
- Pumpkin
- Paint
- Exacto knife
- Pipe cleaners
- Lollipops
- Googly eyes
- Pre-made wreath
Directions:
1. Witch Candy Container
1. Get a paper hat (or fold a piece of paper into a cone shape), and hot glue it to a second piece of decorative paper, such as construction paper.

2. Cut around the cone and continue to affix the paper so that it covers it entirely.

3. Setting the paper-covered cone aside, get an empty flower pot and set it upside-down. Tie some ribbons around it near the top.

4. Get a glass or plastic bowl and put hot glue on the bottom of it so that you can attach it to the flower pot. The pot is the witch’s “body,” while the bowl is the witch’s “head.”


5. Next, fill the bowl with candies.

6. Grab the water collection tray that came with your flower pot and set it on top of the bowl. Do not glue it on. Remember, you need to be able to remove it to get at the candy.

7. Put some glue on the paper-covered cone you made earlier and put it on top of the tray. Combined, the tray and the cone become the witch’s “hat.”

Finish decorating the “witch” with any embellishments you’d like. A couple of little triangles cut from construction paper work great for eyes.

2. Glowing Eyes
1. Start with a toilet paper roll and a marker in any color.

2. Draw eyes on the toilet paper roll. You can make them look however you want—the spookier, the better.

3. Use the guidelines you drew to cut out the eyes using an Exacto knife or anything else you have that will suffice.


4. Now, get some tea lights to put inside. Real fire would be a hazard, as would incandescent light, so choose LED tea lights, which do not generate heat.

Now you have cute glow-in-the-dark eyes you can display anywhere. It just goes to show you can make some pretty cool props using really basic supplies.

3. Painted Pumpkin
Don’t fancy carving a pumpkin? It’s okay, a lot of people don’t really have the skills to do a great job. But you can make a pretty awesome pumpkin just with paint.

1. First, draw the outlines of the eyes on the pumpkin.

4. Next, sketch the mouth.

4. Now, paint the eyes. You can use any color, but black provides a great contrast with the pumpkin.

5. After you fill in the eyes, paint the mouth, using the lines you have drawn for guidance.

6. Attach a bow to the top. If you go with black again, this will help draw emphasis to the eyes and mouth you painted, and will again contrast vividly with the orange.

Attach any extra embellishments you want and paint in added details, and you are good to go. You now have an awesome pumpkin, and you didn’t have to do any carving at all!

4. Lollipop Spiders
1. Begin with a lollipop and some pipe cleaners. Begin cutting up the pipe cleaners so that they are about the same length as the lollipop stick. The pipe cleaners should be black or brown as they are going to be the legs of the spider.


2. Apply glue to the lollipop stick and attach the pipe cleaners. Bend each one at the end so that they are like “feet.”


4. Now attach some googly eyes to the spider.

You now have adorable little spiders with the lollipops as bodies!

5. Halloween Wreath
1. Attach a bow to a simple store-bought wreath.


2. Add some cute pipe cleaner critters or other Halloween decorations.


Embellish with a fake cobweb and hang to display.

Enjoy these spooky Halloween DIY crafts. You can make any one of them in minutes, and probably already have most of the supplies at home!
Related projects: old book, Halloween decorations:


haley
very cute i love it very Halloween like decorations!