
My daughter recently told me she’s a bit tired of her old bedspread. To be honest, I can see why. It’s the same one she’s had on her bed for years. It’s worn and faded, and it isn’t really fit for her age. So we decided it was time to get her a new one. We’ve been hitting department stores, but she never finds anything she likes.
Well, I finally didfind something she’ll enjoy—and I will too, because I get to make it!
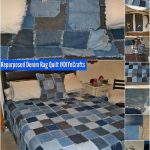
I love projects for old denim scraps. Last year I made an adorable bag out of old jeans, and let’s not forget the project to make a garden apron! This project I found on Instructables teaches you how to make a denim rag quilt!
How many squares you need depends on the bed size you are making. My daughter’s bed is a twin XL, so I need 252 squares (of course, you could use larger or smaller squares and vary the dimensions and amounts). Along with the denim squares, you will also need all the standard sewing supplies (see the Instructables link for the full list).
Here is the short version of the steps:
1. Figure out the dimensions for your quilt and cut the squares you will need.
2. Lay out the squares and plan your design.
3. Begin assembling each of your rows.
4. Sew each of the rows together.
5. Check your measurements again to make sure that they are right.
6. Trim the edges and make sure there are no wrinkles or bumps in your quilt.
7. If you want to add a middle layer, do it now.
8. Secure your backing material.
9. Sew all of your layers together.
10. Tie your quilt.
11. Clip your quilt.
12. Wash your quilt.
13. Clip your knots. Visit this Instructables link and check out the full project with detailed instructions by the author.
And that’s it, really! Again, this is the shortened and simplified version of the instructions, just to give you an idea of what you are getting yourself into if you decide to do this. On the whole, it isn’t a very complicated product—it would be a fine choice even for a beginner at sewing.


Phyllis Dietz
I've made 3 denim quilts. The first I made for my nephew and used pockets and one zipper fly in quilt. I did this intending to put something in each pocket. He was 5 at the time and is now 33 and still had quilt. If found out recently he and my daughter put things IN the quilt through the zipperson loves his, especially likes that there is a pocket in just the right spot to put his tv remote in to keep it handy