

I’ve been gardening in my backyard for several years now, and each year, I’ve learned something new. More often than not, these have been hard-won lessons through trial and error, and I emphasize the word “error.”
One of the first plants I tried to grow was tomatoes because I heard everyone say they were easy. Well … they may be easy, but if so, everything else is ridiculously hard, at least for me. I have gotten them to produce fruit, but only in small amounts, and the tomatoes, on the whole, have been rather small and disappointing.
I just found this super awesome video, though, which includes a ton of great tips and tricks!
There are 10 easy steps to growing high-yield tomatoes!
- Get the right types of tomatoes to grow in your climate. If you need tips, talk to a local expert.
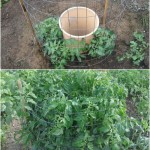
- Lay the plants on their sides.
- Plant them in a trench with the top three inches uncovered.
- Add a fourth to half a cup of slow-release fertilizer.
- Erect a cage around each individual plant. It should be about five feet tall with a two-foot diameter.
- Cover the cages with a floating row cover to provide protection from wind.
- Fertilize the plants each week using a hose-end applicator. Apply directly to the leaves.
- Side-dress the tomatoes with two to three teaspoons of ammonium sulfate after they produce their first yield. Water afterward.
- Wait until tomatoes are 30% ripe, and then pick them. Otherwise, the birds will get them.
- Do not refrigerate tomatoes. They go bad quickly if you do, so put them on the counter instead.
Watch the video for the details, and be sure to check out the other great gardening videos on LDSPrepper’s channel—he’s got a lot of other great advice for growing tomatoes and much more.
Bonus Tip:
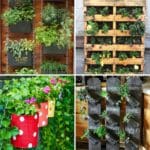
This brilliant watering solution will ensure your plant is well-hydrated and stimulates growth to its full potential! Check out James Bryan's Hometalk post and the discussion; he shares some really insightful tips on growing tomatoes.


Tammy
How do you pick the fruit thru the small mesh?
Michele
Did you watch the video? You cut a hole in the mesh to reach tomatoes.
Susi
Michele--- did YOU watch the video ??! He posted a text pop-up update stating he no longer favors the cages but uses vertical planters now.....so harvesting would be a cinch. Cutting wire away to harvest is silly; after a full growing season there'd be no cage left !
naeem
well get a new cage!!!!!!
Andrew
What is the pale on the inside doing? Is it this there to shape the middle so that you can get some light down there as well as your hands?
Mmadiboka
Hi! I have the best tomatoes grown, I just used Kraal manure and bone meal- all organic.i don't spray them but yes birds eat them
Treva
To keep the birds from "Picking/Eating" my tomatoes I hang some red Christmas balls on the plant/cages.
mELINDA cHAMBERS
AWESOME!!!!
Muriel
Do you remove any leaves and those suckers that grow between the stem and branch?
Stan Kline
I watch your video and learned alot. What about the suckers that form?? I was taut that you take them off for stronger plants and fruit?? Waiting to hear Stan
Rocco
I really miss Lisa Loeb. Cheers.
Renee
Never pick at 1/3 ripeness!! Defeats the purpose of growing tomatoes. Instead, when the first of the season start to turn red, hang red shiny Christmas ornaments on the tomato plants . The birds come and peck at the non-edible balls and realize they're no good to eat.
Gabriele Sovers
Yea don't pick the fruit at 1/3 ripeness. Get bird netting instead so you could leave the fruit on until ripe.
Joe
Great idea!
Ma Kettle
Yep, but with a short growing season (Zone 2b), sometimes even the "local" species don't ripen before frost. We can leave them on the vine only so long.
marjorie
if you will pull the whole tom plant. and take them inside and hang them upside down with straw or newspaper to catch them if they fall. do this in the fall and u will have vine ripened tomatoes well into the winter.
Mandy
My bird did not fall for the ornament trick. I ended up putting small mesh white organza bags over every tomato as soon as they got about the size of a cherry tomato. The birds would not only eat my yellow tomatoes, but the green ones too. I didn't lose any more to the birds after the bags. However, this was my first year growing and I don't know if it was the bags or my watering, or who knows what, but most of my tomatoes had ugly skin. They still tasted great, but were not pretty.
Andrew
I’m an avid gardener and I have had great success with using those little hanging mirrors made a plastic around any garden I don’t want birds to invade. Last year I had a rather large raised garden on my deck, and you could see the bird droppings all on the railings. I hon strings of five or six of these mirrored shapes every 10 feet or so from the eaves of the house and the bird droppings disappeared. I could look out the window or relaxing I make On my couch and watch the birds make a beeline towards my veggies and then suddenly veer away as the dancing lights confuse them. Great for getting rid of bird readings if you have a problem. Don’t put them everywhere in your garden because birds are ultimately good for your garden. Just those areas where they more than you do.
Mayme
That was very helpful for a beginner. I'm going to start a vegetable garden very excited, will let you know my results. Thanks for sharing.
CANDACE
So you have a bucket in the center of the rounds --- you never explained what it's used for.
Rajesh Chaurasia
Very good point you have raised...!!! 😀
PEnnyinCo
I think the picture of the rounds with the bucket in the middle is a different growing setup than LDSPrepper's first setup with the fencing wire cage, There's only one plant in each of those cages.
If you're interested in a good alternative for supporting your tomatoes, check out Florida Weave on YouTube.
Ma Kettle
Probably has a small hole in the bottom or low on the sides to drip water slowly instead of dousing plants with a sprayer or leaving a sprinkler on.
Ma Kettle
Probably has a small hole in the bottom or low on the sides to drip water slowly on the target plants instead of dousing them with a sprayer or leaving a sprinkler on. Just fill the bucket and walk away.
CARLA
I haven't watched the video yet, but logically, I would guess that the bucket has holes in it so that you could fill it to the brink with water for a slow release of water/fertilizer, etc.
B
Seems like a awful lot of chemicals required. I think I would rather have fewer tomatoes that haven't been sprayed with chemicals so many times.
Also, picking them before they are ripe just ruins the taste. That's why "vine ripened" at the store is more expensive. They taste better!
Beth
I'm with B. I would rather just have a compost-rich soil. I make my own. And NOTHING tastes better than a freshly-picked vine-ripened tomato! I don't like using chemicals, so am working on making compost tea as a spray. Locally, the squirrels eat more than the birds... Like the yellow varieties and will get more, though!
Agnes
How do you make compost tea? Thanks
Kate NY
You create a wormery, it's super easy to DIY. Lots of YouTube how tos. Use tiger worms/red wigglers. It takes a number of months, but the fertilizer produced from composting is better than any chemicals and if you compost organic, and filled with nutrients, your fertilizer is organic. It's fantastic stuff.
Rajesh Chaurasia
Make an organic compost (if possible)... With the mixture of Cow dunk, cow urine, cow milk, curd and its butter! Balanced and very rich source of NPK. Spray it as an organic pest control and pour it on the soil as an organic growth booster and plant food.
PennyinCo
That's worm tea you're describing.
Compost tea comes from soaking completed compost in water and using the rich brown liquid for your plants. (You can still use the compost remaining as a soil amendment.)
Both worm tea & compost tea are similar, and highly nutritious.
BTW, I prune off the suckers and side branches for a good foot above the soil, IN ADDITION to pruning off the side growth for at least a third of the plant when I first plant it. One reason - keep the plants from touching the soil (where disease can lurk). Another reason - make a good strong set of branches to keep the plant growing upwards and being strong enough to support a decent crop of tomatoes.
Anonymous
poop in a cup...lol
Donald Gibby
If you don't want to use chemical fertilizers, start a worm farm and use the worm tea. It's 100% natural and your tomatoes will love it. If you need more info check out http://www.happydranch.com/
Donna Ferguson
Tried that.
. The worms are escape artists.
Cindy
I'm with B as well!
Laura
I am going to try what you've done. I always grow tomatoes but never get many. Thanks for the information.
Beth
I will definitely be laying tomatoes on their sides before planting. Great idea! Of course, I always thought you could remove the bottom few leaves, dip in rooting hormone, and plant deeply. Perhaps the two are basically equivalent.
Phyl
It is basically the same technique, but when you lay them on their side you don't have to bury them as deep. The soil is warmer closer to the surface so the tomatoes will grow a little better.
Sheila
Cinnamon is said to be a great starter also and most of have it in our homes.
The bucket in the middle, I assume is for watering the plants. The bucket would be placed in a hole and also holes in the lower side, this way the roots are growing down where the water is.
You can also remove the lower leaves off your tomato plants with each replant, all the little hairs on the stem will become roots, so the deeper you plant the more roots you will have.
I have read the suckers need to be removed.
Happy growing everyone
PennyinCo
Yes, similar. Depends on the depth of the soil you have available to plant your tomato plant in. You could be looking at a hole a good 18 inches or more deep if your plant is big!
Carmelita Cabarrubias
This is an additional insights to me. Thank you so much. I will try it in my backyard.
Juanita Huggins
J.Huggins email address jfhuggins1944@gmail.com
You did not explain the bucket you show in the pictures
Humberto Angleton
Jardinagem vertical - que maximiza a sua colheita, aproveita melhor o espaço limitado, e mantém o suas plantas longe de pragas e podridão. Ocupa apenas quatro metros quadrados de espaço, mas produz mais do que no chão.
sid
I never did learn about the bucket in the middle nor about suckers or what to do when the plants grow over 8 ft tall? please email me as I'm very late for planting in Houston.
bONNNIE
I AM INTERESTED IN THE BUCKET IN THE MIDDLE OF THE CAGE. ALSO, I WAS TOLD TO CUT THE SUCKERS OFF. WHAT IS YOUR OPINION ? I REALLY LIKED YOUR VIDEO. THANK YOU
zeuster10
The bucket is placed a few inches into the gdound with small holes drilled in it. You simply pour water into it and the water slowly saturates into the soil where the surrounding tomatoes get their water at a good rate of flow.
Linda Silver
Hi,
I thought there was only one plant in the cage. If there's a bucket in the middle, aren't the plants too close together like that??
Grace Welton
Such great ideas and tips! My sister is trying to grow tomatoes last few years, but her plants she definitely don't reach their full capacity. Your tips will be of a great help for her, so I'm definitely recommending this post. Thank you for sharing! Greets, Grace from http://gardenerschinatown.org.uk/ 🙂
Jck
What is the bucket imn the middle for?
Maxine Nelson
What is Aluminum sulfate? Another name for it? What is the purpose of using it?
Thanks, Maxine, Connecticut
Vida
Epsom salts
Erin O
Manganese sulfate is epsom salts.
Aluminum sulfate, or Sulfate Aluminum is toxic to plants. It is used to make soil more acid.
Instead use Epsom salts to acidify the soil around your acid-loving plants such as: hydrangeas (for blue flowers) , rhododendrons, azaleas, evergreens, blueberries, etc. Test your soil first before amending it.
Al amos
To prevent birds from eating the fruit dangle unwanted CDs/DVDs on string allowing it to rotate freely ! This I find is a very effective bird scarer for any red blossoms or fruit!
B
You could also make "NICOTINE TEA". Boil a gallon of water, and add loose CHEWING TOBACCO to it and let sit until cooled. Put the "TEA" in a spray bottle, and spray the plants. Won't harm them. You can also use this formula to spray on your lawn to keep dogs from peeing on your lawn.
Jess from TX
...And it poisons the honey bees.
Al amos
Bullfinches love anything red ! They have stripped a cherry tree I had of every last ! Not eating them just picking them off ! Runner bean flowers also fall prey to them . I got round this by growing a white flowered variety called Lady Diana! But the rotating cd / DVD works well and the addition of a fishing swivel at the to stops tangles!
linda prado
Rather than pick them 1/3 ripe, I clip both bottom corners of a ziplock bag and slip it over the tomato. If there is a large tight cluster I use a big baggie. It protects them from birds and cool fall nights. I'm on Long Island, NY and pick into November with this method. I rinse, let dry, store and reuse the bags year after year. It looks rediculous but works well.
Ross
Thanks - some excellent tip there. I place my tomatoes just on the ripe turn in a brown paper bag. That keep them warm and they ripen quicker.
Karen
I agree with Susi. It would have been best to wait for a less windy day very distracting. And turn the phone off before doing a video.
Emmett
I use a cow poo mixture of water and longhorn cow poo. I put 4 cups of that in a two gallon water can. Also put about a table spoon of Epsom salt around each plant each week.
As far as which birds pick on my tomatoes, it's Mocking Birds here.
Rick Gillespie
I agree with the comments about his being a method with WAY too much fertilizer. I grow too many plants for this approach and simply fertilize when planting and again when they show a few blooms. I use Plantone or Gardentone organic fertilizer for the second application. I don't pick that early, let the birds and squirrels have a couple and let them get to 70-80% ripeness in the field. Nothing like picking a ripe tomato and putting it on your sandwich while it is still warm from outside!
I wouldn't feed the tomatoes to my grandchildren if fertilized by this method.
I did use the Florida weave method for keeping the plants off the ground this year for the first time. It is quicker and does a great job even in storms as long as you keep up with the plants.
Linda Silver
Rick,
Hi. What's the Florida weave method?? Never heard of that. Just starting planting when I moved to PA after retirement. Thank.s
Spokane WA. gardner
Note: Using cow or horse manure to organically enrich the soil is good, EXCEPT, both contain a large percentage of weed seeds. My neighbor didn't believe me, until her petunia garden grew more weeds than petunias. Best alternative would be cat or dog droppings, plus, don't forget grass clippings also add organic matter to the garden soil, and are rich in trace fertilizers from fertilizing the lawn.
Secondly, fly strips hanging from a couple low fruit tree branches, collect all sorts of flying bugs before they have a chance to lay their eggs in the soil that surrounds your fruit trees. Fly strips are not sticky enough to catch bees, necessary for pollination. And, don't forget to plant marigolds in the garden as bugs hate the smell.
Lastly, best watering practices for garden and shrubs is a drip irrigation system. Little pricey at first install, but lasts years, and on a timer, all you have left to do, is enjoy the fruit.
Yao
My problem is keeping the tomato plants from falling on its sides. Do I tie it to the cage?
Secondly, is it prudent to cage a couple of plants together?
Charlie
You mentioned adding ammonium sulfate to each plant. Ammonium sulfate is high in nitrogen and will lower the Ph if too heavily applied. Too much nitrogen will give you a lush green plant that looks healthy but at the expense of fruit production. The one tomato plant in your video that stood alone looked to me like it received a heavy dose of nitrogen which may or may not be the case. A better choice in my opinion would be a balanced fertilizer such as 10-10-10 or 5-10 10. If you are organic most organic materials are not balanced and not very high N/P/K. A side dressing with 5-10-10 when tomatoes first form and a side dressing about every 3 weeks of a couple of tablespoons per plant applied at the drip line in a shallow furrow will keep the plant healthy and producing. I have been growing tomatoes for over 40 years and have used many different varieties but have never had a plant produce 80# of tomatoes. I live in Rhode Island and admittedly the season is not as long as some but producing 80# of tomatoes on a single plant is to me a stretch
Mark Donnelly
Do you suggest removing the suckers or not. Your plants are very full and bushy so I believe you may leave them
Meg
If you cover the manure with a heavy plastic or tarp for 2-3 weeks and let it "cook" under the sun it will kill the weed seeds for you.
Karen
Thanks for the tips! Did you buy your raised beds or make them? I'd like to start gardening and the size of your beds seems ideal. Thanks for any thoughts.
Diane
I had a friend put powdered milk around the base of the plants. The plants need calcium as well. For pests, you can also plant companion plants that will keep bugs away, but if you screen the plants, they can get sun and water and no bugs gat in. Also, you can put down a dark mulch or bright red and it will keep the soil warm. Toms like it warm.
Jan Wahl
I was wondering if your thoughts put tomato on side would work for other plants, such as zucchini or spaghetti squash?
Francis
Great video and very helpful. I am definitely going to try this. One or two questions though, which have already been asked but not answered. Do you take off the shoots that come between he leaf joints? My Grandfather told me you should. Now I am not sure as you seem to leave them on. I like the wire support, we use one strong support but I think your way is better. I have a mini greenhouse 6ft tall, so I am going to take out the shelves and put the tomatoes in that. Is 'miracle grow' the same as this method? Will it supply everything the plant needs. Interesting to know you should not put tomatoes in the fridge. I am in England so the climate is wind, rain and some hot sun in summer, but overcast and cold in winter. Tomatoes do not ripen outside until late summer. When should we stop picking the fruit? We make green tomato chutney when fruit has stopped ripening due to the weather and lack of sunshine. Tell me if I am going wrong somewhere please. Much appreciated because although it says heavy fruiting mine just 'don't'! Using Gardeners Delight and Tom Thumb varieties. Thank you for the video and the information. Very good of you to share your knowledge.
Pamela
I love the way you've caged your tomatoes! Once the tomatoes are ripe enough to pick, how do you reach them through the wire to get to the tomatoes out?
We have horrible issues with blight; what are your thoughts on preventing this issue?
Do you pick off the suckers?
Bonnie Meyer
I don''t do any of these things. I dig a deep hole put eggshells and coffee grounds in the bottom and plant the tomato plant almost halfway up the stem. Sometimes I crack a raw egg in the bottom too.
Debby Butzler
We snip off the lower stems, wrap the stem with a strip of newspaper to keep the cutworms at Bay. Dig a trench, add powder milk and Epsom salts to the hole, add some water lay the plant on it's side and carefully bend as you add the soil.
When the tomatoes start to turn 1/3 to 1/2 ripe we pick them, take the stem off, lay them upside down on a tray with newspaper over top in the garage. Check everyday. You can add an apple in there, the gases speed up the riping. My folks use to grow 1000 tomato plants a year.
Paul
Some good tips here. I like the raised beds. Where can I get these or are they a DIY job? You can contact me @ http://www.liverpooltreecare.co.uk
Gene Buchholz
What causes my leafs on my tomato plants to curl
Karen Gibbs
I use blossom set and get a lot more tomatoes at least 2 weeks earlier than normal
MALCOLM Chambers
Feed with Epsom Salts once a fortnight, a tablespoon in an average size watering can should be enough. My plants this year are eight feet tall, and would be taller if I had not pinched out the tops. Also, remove the bottom leaves, this reduces the risk of disease.
A quick way to obtain tomato plants is to cut a thick slice of a shop bought tomato across the middle, put it on top of some compost and cover with more compost. thin out resulting plants once they appear. Make sure you put strong support frame to hold up the plants, as they get very heavy once the fruit forms.